Saturday, December 4, 2021

Berry Pie

This is a blueberry pie I made on vacation in Colorado

 I have made a lot of berry pies. Keith is not fan of cake, so he always gets blueberry pie for his birthday. Some of the birthday pies have gone well and some have been terrible. For years I have searched for the recipe that will give me a berry pie that slices and when you lift it up all the filling does not fall out, but stays in a perfect purple wedge. I have finally found a recipe that works really well. Depending on the berries, some juicier varieties take a little longer to cook, but this recipe works EVERY TIME.

Thanksgiving pies 2021: Black Raspberry pie

There are two key secrets to a good berry pie:

1. Frozen berries

2. Grated apples

The frozen berries seem to keep the pie from going to watery syrup too fast. And I have learned that with berries, frozen does not have to mean processed or sub-par quality. We pick our black raspberries from the yard and put them directly in the freezer until we have enough to make a pie. If you are not freezing your own berries, just make sure you are purchasing organic, good quality berries. If you use strawberries (which you can) you do need to cut them up a bit. The huge frozen ones will give you trouble whole

fresh picked black raspberries (and some peas) on their way to the freezer awaiting their pie debut

The grated apple is a wonderful trick. The pectin in the apple works as a binder for the pie, and it helps with sweetness and consistency. Genius!

Check out that clean cut! That is what you want

This Pie uses two pie crusts. You can find a pie crust recipe HERE. The top crust is going to need vent holes. I latticed my top, but you can just cut slits to vent the steam too.


Berry Pie

Ingredients:

For the Filling:

  • 1 small golden delicious apple (shredded on the side of a box grater)
  • 5 cups berries (frozen)
  • 2 tablespoons fresh lemon juice
  • 2 teaspoons lemon zest
  • 1/2 cup granulated sugar
  • 1/2 cup light brown sugar packed
  • 3 tablespoons cornstarch
  • 1/2 teaspoon ground cinnamon
  • 1/8 teaspoon ground cardamom
  • pinch of ground cloves
  • 1/2 teaspoon salt

For Finishing:

  • 1 large egg white
  • 1 teaspoon water
  • 2 tablespoons raw coarse sugar

Directions:

or the Filling:

  • Preheat the oven to 425 degrees F. Place a foil lined sheet pan in the oven as it preheats. Combine the apple, blackberries, blueberries, lemon juice, lemon zest, sugars, cornstarch, cinnamon, cardamom, cloves and salt.
  • Pour the filling into a chilled pie crust.
  • Place the pie into the freezer while rolling out the top pastry. Keeping everything cold is key!
  • Roll out the second piece of dough so it fits the cover of the pie.
  • Cover the filling with the second piece of pastry.
  • Cut slits into the pie for venting. Brush with egg wash and sprinkle with sugar.
  • Bake on the pre-heated baking sheet. Bake for 25 minutes.
  • Lower the oven to 375 degrees. Bake for another 35 to 40 minutes or until the pastry it a golden brown.
  • Remove from oven and allow it to cool for 2 to 3 hours to allow the pie filling to thicken.


Wednesday, November 3, 2021

Nasturteum Compound Butter


If you have not discovered compound butters you should try them. They are a thing of magic. You can just spread them on bread to make a savory toast, or you can put them on top of hot cooked steaks and fish. The herbs and garlic are activated by the heat as the butter melts, it is amazing. We have used this recipe on fresh baked bread when we were having soup, and we put it on Salmon tonight which was amazing.

I have been experimenting with cooking Nasturteums this fall. Our first frost is coming soon, and I am trying to use as many of the plants I have grown as possible. This recipe is relatively easy, and uses a good mix of herbs and plants that need to be harvested right now. The beauty of this recipe is that you can freeze the butter, and it keeps the herbs fresh. So in the middle of winter when you are craving some fresh herbs you can whip out your compound butter!


Nasturteum Compound Butter

1 cup butter, softened

1 cup nasturteum flowers, devided

1 cup mixed fresh herbs, finely chopped

1/2 tsp salt

1 clove garlic diced


1. Take 1/3 of the flowers and muddle them with the salt in a mortar & pestle. If you don't have a mortar and pestle, you can use a bowl and a wooden spoon. You want to create a paste to distribute the flower essence. Finely chop the remaining flowers.


2. Combine the butter, flowers, herbs & garlic. Mash all the ingredients. Knead the mixture together well to evenly distribute the falvoring agents. 

3. You can use it right away, place in a sealed container in the refrigerator for a week, or wrap in plastic wrap and freeze for later.


Suga-Plumb Jam


There are plumb trees in my neighborhood. This year they were laiden with plumbs, more than the owner could pick, and neighbors were invited to come and pick. We went and picked a basket full of plumbs, and you never would have known that we picked any. SO MANY PLUMBS. 

Beautiful neighbors picking plumbs

I was excited to get plumbs because an abundance of plumbs because lots of plumbs means PLUMB JAM! This recipe is spiced plumb jam, a.k.a Suga-Plumb Jam. It tastes like spicy sweet Christmas, and is one of my favorite jams to make. If this is your first time trying jam, be sure to familiarize yourself with the safe procedures for preserving. More info HERE

Suga-Plumb Jam

Ingredients:

4 pounds plumbs pitted & diced

4 cups sugar

3 tablespoons powdered pectin

1 1/2 teaspoons cinnamon

1/2 teaspoon nutmeg

1/2 teaspoon alspice

1/4 teaspoon ground cloves

1 lemon juiced and zested


Directions:

1. Heap the plumbs in a non-reactive pot, add the sugar, pectin, and spices. Stir the mixture until everything is combined and the plumbs are juicy. Add the juice and zest from the lemon and heat the pot on high heat.


2. Bring the fruit to a boil and then reduce to medium heat.

3. Cook the fruit on a low boil for 25-30 minutes until the plumbs soften and the syrup thickens. You will know when the jam is done when it becomes more resistant to stirring, and when you pull the spoon out of the pan the droplets will be thick and slow moving.


4. Remove the pot from the heat. Funnel the hot jam into serrilized, hot jars. Wipe the rims, and seal with sterilized, hot lids. 


Process in a hot water bath for 10 minutes, then let the jars sit until the lids pop and seal. This recipe makes 7-8 half pint jars.


Spooky Shortbreads


I am thoroughly enjoying having capable kids who bake and cook. Tim wanted to bring a treat for his advisory group at school the week. He found this Jamie Oliver recipe and put his own twist on it. He did a great job, so I am blogging his creation 😊


Spooky Shortbreads

Ingredients:

11 tablespoons butter at room temperature, cut into tablespoons

1 1/3 cups all purpose flour

1/4 cup sugar

1 lemon zested

icing & melted chocolate for decoration

Directions:

1. Preheat oven to 375 degrees. Prepare an 8x8 pan with parchment. In a medium bowl combine the butter, flour sugar and zest by pinching it together with your fingers until the mix is crumbly and the butter is in small pieces. 

2. Press the crumbly mix into the bottom of the pan. Prick the dough all over with a fork and bake for 20 minutes until golden.

3. When the dough has cooled cut it and decorate. For these shortbreads, we made a spiderweb with white icing and a little chocolate spider on each.

Tuesday, November 2, 2021

Nasturtium Pesto


Nasturtiums are one of my favorite things to grow. I just love their vibrance and how full they grow as the summer progresses. Their flowers are lovely and the round lilly-pad-like leaves are unique in the garden.  I regularly plant nasturtiums around my vegetables because they attract polinators and keep harmful pests from the veggies. I have always knows that the flowers were edible, and I have been known to throw a couple on a salad every once in a while. But this year I have been experimenting with using the whole plant more. I found this recipe for nasturtium pesto and it is really tasty! It did not last more than a week in the refrigerator, so I am going to try freezing another batch. 

We used this with pasta and grilled veggies and it was delightful. The Nasturtium pesto has a slightly earthy and more peppery taste than basil-only pesto but it deliveres the same bright fresh addition to any recipe.


Nasturtium Pesto

Ingredients:

  • 2 cups packed nasturtium leaves
  • 1 cup nasturtium flowers
  • 1 cup fresh basil
  • 3/4 cup quality olive oil
  • 3 cloves garlic
  • 2/3 cup nuts (I used Brazil nuts, Walnuts or Almonds work well too)
  • 3/4 cup shredded  Parmesan cheese
  • 1/2 teaspoon fresh lemon juice
  • salt, to taste
Directions:

1. Add all the ingredients in a food processor or or blender. I usually process the garlic nuts and cheese first, then add the leafy greens, lemon and oil.  Add more oil until the pesto reaches your desired consistency. Salt to taste.

2. Store in the refrigerator (or freezer) for up to one week. Use as you would any other pesto.


Catherine's Cookies


It is amazing how tastes, smells and sounds can bring us back to specific moments in our childhood. This cookie recipe is one of those for me. My grandmother used to make these cookies for us a lot when I was growing up. I don't know who Catherine is, or why this recipe is named after her, but I like her cookies.


They are a simple cookie, but they are unusual. They are light and crispy, while still having a satisfying chewy texture because it has some surprises. This recipe incorporates oats and Rice Krispies! We had a box of Rice Krispies given to us recently. No one in this house will actually eat them for breakfast because they taste like air, so I needed something to do with the cereal. We made Rice Krispy treats and still had most of the box left. Then I remembered these cookies. I have the recipe in a frame, which I love because it is one of my favorite things my grandmother would make, and it is in her handwriting. I did have to make some tweaks to the recipe. Margarine is not an item that I keep on hand. I substituted butter just fine, and I am sure you could use coconut oil too witout any trouble. I also added cinnamon, because cinnamon is awesome and I like it.


It was fun to share these with my own kids. They liked them a lot, and they were a welcome change from the normal cookie roster. The recipe does make A LOT of cookies though. They lasted us for over 2 weeks. Plus side: they still tasted good after two weeks. 😆I hope you try them with your own left over Rice Krispies and enjoy.

Catherine's Cookies

Ingredients:

1 Cup white sugar

1 Cup brown sugar

1 Cup oil

2 sticks of margarine (or butter or coconut oil)

1 egg

2 Teaspoons vanilla

3 1/2 Cups flour

1 Teaspoon salt

1 Teaspoon baking soda

1 Teaspoon cream of tartar

1 Teaspoon of cinnamon

1 1/3 Cups oatmeal

1 1/3 Cups Rice Krispies

1 1/3 Cups finely chopped nuts 

(I have a nut adverse eater in my house, I just compensated with an additiona 2/3 cups of both oatmeal and Rice Krispies)

Directions:

1. Cream together sugars, oil and margarine or butter.

2. When the mix is light and fluffy, add the egg and vanilla.

3. Add the dry ingredients: flour, salt, baking soda, cream of tartar and cinnamon.

4. When the dry ingredients are completely incorporated, fold in the oatmeal, Rice Krispies and nuts. The batter will be very light and fluffy

5. Drop by teaspoonfulls onto a parchment lined baking sheet. Flatten the batter balls with your hand or a glass. 

6. Bake at 350 degrees for 8-12 minutes (depending on the size of your cookies). They are done when the edges are golden. Yeilds 8 dozen


Monday, October 18, 2021

Tomatillo Crudo


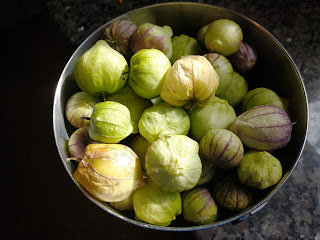
Tomatillos I picked today!


October has brought a bumper harvest of tomatillos. I love their fresh and slightly tangy taste, but this is the first year I have ever grown tomatillos and I have very little experience cooking with them. Thankfully, I have some fancy friends who passed along a recipe they use for Tomatillo Crudo. I love this recipe. It is easy, delicious and never lasts long in our house. But I also love the recipe because it is from Kate and Omar Ortiz. They are fantastic friends who recently relocated to San Diego. Our family misses their family very much, but making this recipe and enjoying its deliciousness reminds me of them, and makes me happy. 


I don't always have cilantro, but I have had a bumper crop of Italian parsley. That has worked well, and I sometimes add lime or lemon. 

Boston misses you Ortiz family!