|
My husband's family is southern, and they know what to do with peaches. I have been graciously grafted into the family and have had the privilege to sit under the tutelage of some amazing southern cooks. Ladies who learned to use what they had around them, stretch it to feed a crowd, make it delicious, and look beautiful and graceful at the same time. It is a sacred thing to stand in a hot kitchen with a master and watch her craft something amazing. My heart hurts just a little as I write this because we have lost a few of these magnificent ladies recently, and I miss them. I also realize that it is important to recognize that it is because of them that I started this blog.
Part of my grafting was this cookbook:

At my wedding shower I was presented with this book, partially filled out with the recipes that my husband's grandmothers and mother knew were his favorite. Over the years I filled it with my own family's favorite recipes, ones I never wanted to loose because they work perfectly every time. But the book got full, and gross. the pages are stained brown with splashes of vanilla, and the edges are gritty with flour. I started this blog to keep these family recipes, and new ones I came across so I could always find them. This recipe is from my Husband's great grandmother, Mama Long. It is one of the easiest recipes I have ever done. My boys know it, they know how to make it, (look out ladies) they know where it comes from, and they love to eat it. Eating and cooking with your family is a sacred cultural ritual. Here is a little slice of our family culture. I hope you enjoy it and make it your own.
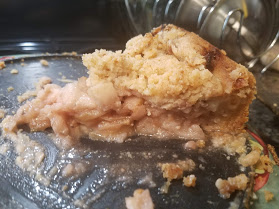
Mama's Cobbler
This recipe is made in a 9x9, but it is easily doubled in a 9x13 for a crowd
Ingredients:
2 cups fruit (peaches, peeled and sliced or berries work well, but you can use whatever you have)
1/4 cup sugar
1 cup flour
1 cup sugar
1 tsp baking powder
1 cup milk
1 stick of butter
Directions:
1. Preheat the oven to 350 degrees.
2. In a medium bowl, combine fruit and 1/4 cup of sugar. Let it sit while you prepare the rest of the recipe. the sugar will dissolve with the juices of the fruit, this helps create the filling.
3. Before you begin the batter, place a 9x9 baking dish in the oven with the stick of butter. This step is important! You want to melt the butter and heat up the pan. It is going to do something amazing!
4. In a different medium bowl combine flour, 1 cup sugar and baking powder. (I also like to shake in some cinnamon depending on what fruit I am using) Add milk, and whisk with a fork to remove lumps. It should look runny like pancake batter.

5. When the butter in the pan that is in the oven is melted you are ready to put the whole thing together. Carefully open your oven, if you can safely reach your baking pan while it is in the oven by sliding out your rack, do that. If not, carefully remove the melted butter in your baking dish from the oven. First, pour the batter into the hot butter dish, Then gently spoon the fruit on top of the cobbler batter.
*I know, you all are reading this thinking...that's not right...that's backwards. Trust me. These are not family recipes for nothing. The ingredients literally invert themselves. It's amazing.*
 |
| What do you do for 45 minutes while the cobbler is cooking? Take silly family selfies of course! |
6. Bake for 45 minutes, or until the top is golden brown and the fruit is bubbling. It is good to let the cobbler rest so the juices set, but that never happens in my house. We also believer it is served best with ice cream.