Friday, February 8, 2019

Cinnamon Sugar Pumpkin Muffins

Recently I watched the newest season of The Great British Baking show, and felt inspired to bake. I had a can of pumpkin in the pantry and decided pumpkin muffins would happen. I love the way a good spicy pumpkin muffin fills the house with a sweet comforting smell. I found this recipe, it is probably the best muffin recipe I have ever used. The muffins puff up beautifully, they are moist and spicy and not too crumbly. The cinnamon and sugar topping bakes up crunchy and gives the muffin just enough sweet to balance the spice.


Cinnamon & Sugar Pumpkin Muffins

Ingredients:
1 3/4 cup all-purpose flour
1 tsp baking soda
1 tablespoon of pumpkin pie spice (I like a lot of spice, pretty sure I put more)
1/2 tsp salt
1/2 cup melted butter
1 1/2 cup sugar
1 1/2 cups pumpkin puree
2 large eggs
1/2 cup regular Greek yogurt
1 tsp vanilla

topping:
3 tbsp brown sugar
1 1/2 tbsp cinnamon

Directions:

1. Preheat oven to 425 degrees & line a 12 cup muffin pan with paper liners or grease with butter or coconut oil.

2. In a large bowl mix together the dry ingredients: flour, baking soda, pumpkin spice and salt. Set aside.

3. In  a medium bowl, stir together the wet ingredients. Whisk together the butter and sugar first, then add the pumpkin puree, eggs, yogurt and vanilla until smooth.

4. Add the wet ingredients to the dry ingredients and stir until just combined. Divide batter evenly between the 12 baking cups.

5. Mix the brown sugar and cinnamon together in a small bowl. Sprinkle cinnamon & sugar mixture over the muffins.

6. Bake for 5 minutes at 425 degrees, then reduce the oven temperature to 350 degrees and continue baking for 15-18 minutes. You will know the muffins are done by using the touch test. If you gently press the top middle of a muffin and it springs back into shape and does not retain a dent from your finger the muffin is done.

Wednesday, October 17, 2018

Mama'a Cobbler


 My husband's family is southern, and they know what to do with peaches. I have been graciously grafted into the family and have had the privilege to sit under the tutelage of some amazing southern cooks. Ladies who learned to use what they had around them, stretch it to feed a crowd, make it delicious, and look beautiful and graceful at the same time. It is a sacred thing to stand in a hot kitchen with a master and watch her craft something amazing. My heart hurts just a little as I write this because we have lost a few of these magnificent ladies recently, and I miss them. I also realize that it is important to recognize that it is because of them that I started this blog.

Part of my grafting was this cookbook:


At my wedding shower I was presented with this book, partially filled out with the recipes that my husband's grandmothers and mother knew were his favorite. Over the years I filled it with my own family's favorite recipes, ones I never wanted to loose because they work perfectly every time. But the book got full, and gross. the pages are stained brown with splashes of vanilla, and the edges are gritty with flour. I started this blog to keep these family recipes, and new ones I came across so I could always find them. This recipe is from my Husband's great grandmother, Mama Long. It is one of the easiest recipes I have ever done. My boys know it, they know how to make it, (look out ladies) they know where it comes from, and they love to eat it. Eating and cooking with your family is a sacred cultural ritual. Here is a little slice of our family culture. I hope you enjoy it and make it your own.


Mama's Cobbler
This recipe is made in a 9x9, but it is easily doubled in a 9x13 for a crowd

Ingredients:

2 cups fruit (peaches, peeled and sliced or berries work well, but you can use whatever you have)
1/4 cup sugar

1 cup flour
1 cup sugar
1 tsp baking powder
1 cup milk

1 stick of butter

Directions:

1. Preheat the oven to 350 degrees.

2. In a medium bowl, combine fruit and 1/4 cup of sugar. Let it sit while you prepare the rest of the recipe. the sugar will dissolve with the juices of the fruit, this helps create the filling.

3. Before you begin the batter, place a 9x9 baking dish in the oven with the stick of butter. This step is important! You want to melt the butter and heat up the pan. It is going to do something amazing!

4. In a different medium bowl combine flour, 1 cup sugar and baking powder. (I also like to shake in some cinnamon depending on what fruit I am using) Add milk, and whisk with a fork to remove lumps. It should look runny like pancake batter.


5. When the butter in the pan that is in the oven is melted you are ready to put the whole thing together. Carefully open your oven, if you can safely reach your baking pan while it is in the oven by sliding out your rack, do that. If not, carefully remove the melted butter in your baking dish from the oven. First, pour the batter into the hot butter dish, Then gently spoon the fruit on top of the cobbler batter.
*I know, you all are reading this thinking...that's not right...that's backwards. Trust me. These are not family recipes for nothing. The ingredients literally invert themselves. It's amazing.*

What do you do for 45 minutes while the cobbler is cooking? Take silly family selfies of course!


6. Bake for 45 minutes, or until the top is golden brown and the fruit is bubbling. It is good to let the cobbler rest so the juices set, but that never happens in my house. We also believer it is served best with ice cream.


Apple Pie Cake

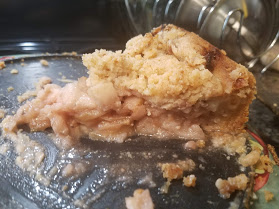
Our family gets really excited about apple desserts. I found this recipe and it just seemed like it would meet the Riddle standard, minimal ingredients and prep, delicious sweet apple dessert. We tried it last night to bring to our Be The Bridge group, and it was a hit. Just so that you know...this desert works well as breakfast too!

This here folks is the last piece. I had to fight to get a picture.

At first glance you may think this dessert has an identity crisis being both pie and cake. But what I have found is that this recipe takes the best parts of both cake and pie and combined them into something beautiful. Super easy prep. There is a biscuit-like dough to prepare that gets pressed in as the crust, apples with just lemon and cinnamon go on top, and then more of the same dough sprinkled on the apples. At some point in the oven the apples release their juice combining with the crust and sprinkled bits, and it becomes a magical mash-up of cake and pie. It cooks for a while, so go read a book or fold some laundry, but it is worth the wait, I assure you.


Apple Pie Cake

Ingredients:
2 Cups flour
1 cup light brown sugar, packed
2 tsp ground cinnamon
Pinch of Salt
1/2 lb (2 sticks) cold butter cut into pieces
5 lbs (about 12 medium) apples
   -Granny Smith apples hold up well in this cake/pie
2 tbsp lemon juice, or the juice of one lemon

Directions

1. In a large bowl, combine flour, brown sugar, salt and 1 tsp of cinnamon. Using a pastry blender or two table knives, cut in the butter until it is incorporated in pea-size pieces. (this is just like making scones or biscuits) The mix will be dry and crumbly, but will stick together if you pinch it with your fingers.

2. Preheat oven to 350 degrees.

3. Cut apples into thin slices. *some people peel their apples here. I don't. No one in my family cares enough, and I like the peels, but do what you like* Toss apple slices with remaining cinnamon and lemon juice. (I also used a pinch of cloves, allspice and cardamom)

4. Press 2/3 of the flour mix into a 9 inch spring-form pan. You will want to press the mix to cover the bottom and work it up the sides of the pan to make a crust.

5. Pour the apples into the prepared crust. Press the apples down as much as you can into the crust. They will mound over the rim of the pan, that's ok.

6. Sprinkle the remaining flour mixture on top of the apples.

7. Bake on the middle rack of your oven for 1 hour and 15 minutes, or until golden brown on top and you see the apples bubbling. It is a good idea to put a baking sheet on the rack beneath the pie/cake while it cooks. The apples release a lot of juice. (which is part of the magic of this dessert, but it may make a mess if it comes out all over your oven)

8. Remove the pie/cake from your oven, and allow it to cool completely in the pan before you remove the outer band. Serve and enjoy!

Wednesday, September 19, 2018

Chicken and Dumplings

Keith has a smoker. There has not been much up on the blog yet about the smoker, but it is a fantastic addition to our family. We have smoked a lot of meat. This weekend we smoked two chickens. I used them for meals a few times, and I was left with two carcasses and one thigh.

The golden rule of whole chickens...DON'T YOU DARE THROW THAT CARCASS AWAY!

Slowly boiling the chicken carcass makes fantastic stock, and it gives you every little bit of the meat you could never pull off with your fingers. Never, ever, ever, especially when it is smoked.

I made an amazing flavorful and smoky stock, picked off all the meat, and made Chicken and Dumplings with it. It was awesome. Here is the recipe


Chicken And Dumplings

 4 cups Home Made Chicken broth ( see above)
4 cups shredded chicken cooked, or 4-5 chicken thighs raw
2 tbsp butter
4 carrots, sliced in half and then 1 inch chunks
1 onion, diced
2 stalks of celery, cut into 1 inch slices
2 parsnips, cut in half and then 1 inch slices
2 cloves of garlic, minced
pinch of red pepper flakes
1/2 cup flour
1/2 cup white wine

Dumplings:
3/4 cup flour
1 3/4 tsp baking powder
1/2 tsp salt
1/2 cup milk

1. heat butter in a dutch oven or heavy bottomed stock pot over medium heat. Add onion, garlic, celery, parsnips, carrots and red pepper flakes, season with salt and pepper. Saute for about 5 minutes or until the onions begin to turn opaque.

2.  Add the flour, mix well and cook for a minute. Add the wine first to de-glaze the pan. Be sure to scrape the bottom of the pot with your spoon. Then add the stock, continuing to make sure you clear any flour from the bottom of the pan. Add chicken and bring to a boil.

3. while you wait for the pot to boil mix together your dumpling dough. It should look sticky, a bit more solid than pancake mix.

4. When the pot comes to a boil, drop the dumpling mix by large spoonfulls onto the surface of the stew. you should be able to make 10 dumplings.

5. When the dumplings are all set, cover the pot, reduce the heat to low and cook for 20 minutes, or until  the chicken is cooked (if you used raw thighs) and the dumplings are no longer doughy in the middle.

Chex Mix

This blog started as a way for me to keep track of recipes I used and liked and didn't want to have to scrounge around for when I wanted to use them again.

I scrounged yesterday.

This fall I am working part time, and in the part of my time that I am not working I am ORGANIZING!! It is glorious. It is necessary and it is fun. Yesterday I was cleaning out a ridiculously deep cabinet in my kitchen and found that there were 9 little individual breakfast packets of Chex. My kids seemed to be ignoring them as a source of breakfast cereal so I decided to make Chex Mix with them. Easy. (it really is if you have the recipe handy) I KNEW I had it somewhere. Grandmother makes a continuous stream of it at Christmas. I could not find it. So I did what I should have done in the first place, I went to the internet. Easy.

So here it is. Chex Mix. The way to redeem an overlooked breakfast cereal into a disappearing snack.


Ingredient List
  • 3 cups Corn Chex™ cereal
  • 3 cups Rice Chex™ cereal
  • 3 cups Wheat Chex™ cereal
  • 1 cup mixed nuts
  • 1 cup bite-size pretzels
  • 1 cup garlic-flavor bite-size bagel chips or regular-size bagel chips, broken into 1-inch pieces
  • 6 tablespoons butter or margarine
  • 2 tablespoons Worcestershire sauce
  • 1 1/2 teaspoons seasoned salt
  • 3/4 teaspoon garlic powder
  • 1/2 teaspoon onion powder
Preparation
  1. In large microwavable bowl, mix cereals, nuts, pretzels and bagel chips; set aside. In small microwavable bowl, microwave butter uncovered on High about 40 seconds or until melted. Stir in seasonings. Pour over cereal mixture; stir until evenly coated.
  2. Microwave uncovered on High 5 to 6 minutes, thoroughly stirring every 2 minutes. Spread on paper towels to cool. Store in airtight container.
Tips
  • Substitution: The original recipe includes Corn Chex™, Rice Chex™ and Wheat Chex™. You can mix and match to suit your taste—just use a total of 9 cups of cereal. I also like pretzels or Cheez-its. Try it with whatever your family likes.

Monday, May 14, 2018

Hollandaise Sauce


In our house Keith is the king of breakfast. He has perfected all things breakfast and every time he cooks I am reminded why we never brunch like swanky city people. I can eat fantastic brunch in my pajamas and avoid the wait, the crowd, and the pricetag.


But the king of breakfast needs his queen.


For mother's day breakfast Keith made eggs benedict, which was a major undertaking since both sets of parents and great-grandmother Alice where visiting. (It may be worth mentioning that the king of breakfast graduated from seminary the day before) Anyway, 10 orders of eggs Benedict is a lot of work, a lot of eggs, and he needed me because...ahem...I can make a bangin' hollandaise from scratch!


I need to thank Julia Child for her detailed directions and recipe. I have transcribed it here so I never loose it. I like to use a double boiler with a copper bowl. The bowl holds the heat evenly, and the double water boil keeps the heat even and it is less likely to scaled or burn. If you do not have a proper double boiler, (which I don't) you can use a small saucepan and metal mixing bowl. Place about an inch of water in the bottom of the pan and bring it to a simmer. Add the bowl and ingredients to the low heat water when you are cooking.


Seriously, there is nothing like a perfectly rich and tangy hollandaise sauce. This is the recipe I use.

READY IN:
 15mins
YIELD:
 1 1/2 cups
UNITS:
 US

INGREDIENTSNutrition

  • 3egg yolks
  • 1tablespoon water
  • 1tablespoon fresh lemon juice, if needed (or more)
  • 6 -8ounces very soft unsalted butter
  • 1dash cayenne pepper
  • salt, to taste
  • fresh ground white pepper, to taste
  • Whisk the yolks, water, and lemon juice in the saucepan or bowl for a few moments, until thick and pale (this prepares them for what is to come).
  • Set the pan over moderately low heat and continue to whisk at reasonable speed, reaching all over the bottom and insides of the pan, where the eggs tend to overcook.
  • To moderate the heat, frequently move the pan off the burner for a few seconds, and then back on. (If, by chance, the eggs seem to be cooking too fast, set the pan in the bowl of cold water to cool the bottom, then continue).
  • As they cook, the eggs will become frothy and increase in volume, and then thicken. When you can see the pan bottom through the streaks of the whisk and the eggs are thick and smooth, remove from the heat. (Or just use the double boiler like I told you about above)
  • By spoonfuls, add the soft butter, whisking constantly to incorporate each addition. As the emulsion forms, you may add the butter in slightly larger amounts, always whisking until fully absorbed. Continue incorporating butter until the sauce has thickened to the consistency you want.
  • Season lightly with salt, pepper, and a dash of cayenne pepper, whisking in well. Taste and adjust the seasoning, adding droplets of lemon juice if needed. Serve lukewarm

Sunday, April 22, 2018

Bean and Veggie Taquitos


We hit a milestone last night. Keith and I went out with friends to see an exhibit at the MFA, and we left the three boys to fend for themselves. Joe is now almost 14, so legally it's all good, but we all know how brothers can be. I did a lot of praying. I also made this recipe for them to eat for dinner. Something new and interesting to help keep them happy so I could go look at art.


It turned out great! They are pretty quick, cheap and easy to make. This recipe makes 12 taquitos. I used pinto beans and red pepper because that is what I had. You could use any beans or meat that you like. Also feel free to change up the veggies to your liking. Black bean and left over cooked sweet potato would work great. This recipe is a canvas you can paint the way you like. Have fun!


Bean and Veggie Taquitos

Ingredients:
8 oz cream cheese, softened
1 - 14oz can of beans, drained (pinto or black work well)
1/4 cup canned chopped chilis
1/2 red bell pepper finely diced
2 scallions diced
1/3 cup cubed cheddar cheese
1/2 tsp oregono
1/4 tsp cumin
1/4 tsp chili powder
salt and pepper to taste
12 flour tortillas
butter or oil for the pan

Directions:
1. Combine cream cheese, beans, chilis, pepper, scallions, cheddar and spices. Gently fold together to combine.


2. Assemble the taquitos. Lay one tortilla on a clean work surface, then place two heaping tablespoons of filling near the edge closest to you.


 Smooth out the filing along that edge and roll the tortilla tightly away from you starting with the filling edge. Heat your pan while you roll your tortillas.


3. Place 5-6 taquitos in a pre-heated skillet, seam side down. Cook until they brown, 2-3 minutes, then turn to brown on another side. Continue until all sides are browned. Serve right away. If you are cooking in batches, cooked taquitos can be kept warm in a baking dish placed in the oven at 200 degrees.