I meant to post this last week, but didn't. Dwight and I were talking about scones and I wanted to post my Super Scone recipe. This one works AWESOME every time, and it can be switched up so easily depending on what you have in the pantry. I made some today for Bible study with dried cranberries and golden raisins with a citrus glaze. They were awesome. Use this recipe, make it your own and enjoy.
Scones
3 cups flour
1 tbsp baking powder
1/2 tsp salt
1/2 cup cold butter cut into pieces
1 cup dried cherries
1 cup + 1 tbsp milk
Preheat oven to 450. In a medium bowl combine flour, baking powder, and salt. (this is also where you would add any spices, ex: 1 tsp cinnamon) Incorporate butter with a pastry blender until the pieces are pea size or smaller. Add the dried cherries (or cranberries, apricots, bananas, chocolate chips, nuts, etc...) and stir to coat them with the flour. Slowly stir in milk using a fork. When the dough is just coming together turn it out onto your work surface and knead 14 times. Form into a flat disk about one inch high and cut into eight equal wedges. (Sometimes here I will brush the scones with milk and sprinkle with sugar, if I am not glazing them) Bake on parchment for 15 -18 min until the edges are browned and the insides are no longer doughy. Cool completely before glazing.
Citrus Glaze:
1 tablespoon lemon zest
1 1/2 cups powdered sugar
1-2 tablespoons of orange juice
Stir all ingredients together. Add small amounts of juice if the icing is too thick, or sugar if it is too thin. The icing can be drizzled on or you can dip the tops of the scones in the icing and let it drip down the sides. Let the icing harden completely before you store or serve.
Showing posts sorted by relevance for query scones. Sort by date Show all posts
Showing posts sorted by relevance for query scones. Sort by date Show all posts
Thursday, May 5, 2011

Tuesday, August 7, 2012
Tomato Orange Marmalade
Here is another fun way to use tomatoes. This jam takes a long time to boil down, but it is delicious and goes great with scones. http://sarahsfreshlife.blogspot.com/search?q=scones

Tomato Orange Marmalade
3 lbs tomatoes, chopped (this is about 15 medium tomatoes)
3 cups sugar
2 oranges
1 lemon
1/8 tsp salt

1. Chill 2 small plates in the refrigerator for testing your Marmalade, and sterilize your canning equipment and jars.
2. Chop your tomatoes. Grate the peels of the fruit. (I used the zester for the lemon and a large holed cheese grater for the oranges.) Then gently cut the tops and bottoms off the lemon and oranges. Standing them up on a flat end cut the white pith off in strips from the top down. Reserve the strips and the tops. Holding the naked orange or lemon in your hand over your bowl, cut out the fruit segments by running your knife along the pith of each segment. Place the fruit segments in the bowl, and try to catch as much juice as you can into the bowl as you work. When you are done, squeeze as much juice as you can out of the left over pith and tops you previously cut.
3. Add all ingredients to a large pot over medium heat. Stir frequently until sugar is dissolved. (about 6 min)
4. Simmer on low, stirring occasionally as marmalade thickens (50 to 90 min)
5. Begin testing the marmalade after 50 min. Drop a spoonful of Marmalade on a chilled plate, then tilt; if the marmalade is done it should remain in a mound and should not run.
6. Process by filling sterilized jars and boiling 10 min. Let Marmalade stand in jars for 1 day for flavors to develop.

Tomato Orange Marmalade
3 lbs tomatoes, chopped (this is about 15 medium tomatoes)
3 cups sugar
2 oranges
1 lemon
1/8 tsp salt

1. Chill 2 small plates in the refrigerator for testing your Marmalade, and sterilize your canning equipment and jars.
2. Chop your tomatoes. Grate the peels of the fruit. (I used the zester for the lemon and a large holed cheese grater for the oranges.) Then gently cut the tops and bottoms off the lemon and oranges. Standing them up on a flat end cut the white pith off in strips from the top down. Reserve the strips and the tops. Holding the naked orange or lemon in your hand over your bowl, cut out the fruit segments by running your knife along the pith of each segment. Place the fruit segments in the bowl, and try to catch as much juice as you can into the bowl as you work. When you are done, squeeze as much juice as you can out of the left over pith and tops you previously cut.
3. Add all ingredients to a large pot over medium heat. Stir frequently until sugar is dissolved. (about 6 min)
4. Simmer on low, stirring occasionally as marmalade thickens (50 to 90 min)
5. Begin testing the marmalade after 50 min. Drop a spoonful of Marmalade on a chilled plate, then tilt; if the marmalade is done it should remain in a mound and should not run.
6. Process by filling sterilized jars and boiling 10 min. Let Marmalade stand in jars for 1 day for flavors to develop.
Monday, October 14, 2013
Spiced Vanilla Pear Jam

What do you do when you are given a box of pears? Make spiced pear jam! I also had genuine Malaysian vanilla beans from Dwight and Joy that I was saving, the combination produced a beautiful baby. Any kind of pears work for this jam. I received Bartlett pears, but I have also used fresh pears from a local tree. Fresh pears are sometimes hard and people get confused by them, but they work beautifully with this recipe. This jam is great on anything, scones, toast and PB&J, but it really screams to be spread on a soft cheese with crackers. Have some fun and enjoy!
Pear Vanilla Jam
Ingredients
- 8 cups chopped Bartlett pears (or any smooth, thin-skinned pear. There’s no need to peel.)
- 2 vanilla beans, split and scraped
- 4 cups sugar
- 1 packet pectin
Instructions
- In a large, heavy-bottomed pot, combine chopped pears, sugar and vanilla beans (and all that bean-y goodness you scraped out). Cook over medium heat until the fruit can easily be smashed with the back of a wooden spoon. Use a potato masher or immersion blender to break the fruit down into a mostly-smooth sauce (remove the vanilla bean solids before blending).
- Add the pectin and bring to a rolling boil. Let boil for a full five minutes in order to active the pectin, so that the finished product will have a nice jammy consistency.

- 3. Fill jars, wipe rims to remove any residual jam, apply lids (heat canning lids in a small pot over very low heat while you’re preparing the jam to ensure a good seal) and screw on the rims.
- 4. Process the filled jars in a boiling water canner for 10 minutes (start the timer when the pot has returned to a boil). When the time has elapsed, remove jars from pot and place the jars on a towel-lined countertop. Let them cool undisturbed for at least two hours. During this time, the lids should seal. Check to ensure the jars have sealed by pushing down on the center of the lid. If it feels solid and doesn’t move, it is sealed.

Wednesday, October 17, 2018
Apple Pie Cake
Our family gets really excited about apple desserts. I found this recipe and it just seemed like it would meet the Riddle standard, minimal ingredients and prep, delicious sweet apple dessert. We tried it last night to bring to our Be The Bridge group, and it was a hit. Just so that you know...this desert works well as breakfast too!
At first glance you may think this dessert has an identity crisis being both pie and cake. But what I have found is that this recipe takes the best parts of both cake and pie and combined them into something beautiful. Super easy prep. There is a biscuit-like dough to prepare that gets pressed in as the crust, apples with just lemon and cinnamon go on top, and then more of the same dough sprinkled on the apples. At some point in the oven the apples release their juice combining with the crust and sprinkled bits, and it becomes a magical mash-up of cake and pie. It cooks for a while, so go read a book or fold some laundry, but it is worth the wait, I assure you.

Apple Pie Cake
Ingredients:
2 Cups flour
1 cup light brown sugar, packed
2 tsp ground cinnamon
Pinch of Salt
1/2 lb (2 sticks) cold butter cut into pieces
5 lbs (about 12 medium) apples
-Granny Smith apples hold up well in this cake/pie
2 tbsp lemon juice, or the juice of one lemon
Directions
1. In a large bowl, combine flour, brown sugar, salt and 1 tsp of cinnamon. Using a pastry blender or two table knives, cut in the butter until it is incorporated in pea-size pieces. (this is just like making scones or biscuits) The mix will be dry and crumbly, but will stick together if you pinch it with your fingers.
2. Preheat oven to 350 degrees.
3. Cut apples into thin slices. *some people peel their apples here. I don't. No one in my family cares enough, and I like the peels, but do what you like* Toss apple slices with remaining cinnamon and lemon juice. (I also used a pinch of cloves, allspice and cardamom)
4. Press 2/3 of the flour mix into a 9 inch spring-form pan. You will want to press the mix to cover the bottom and work it up the sides of the pan to make a crust.
5. Pour the apples into the prepared crust. Press the apples down as much as you can into the crust. They will mound over the rim of the pan, that's ok.
6. Sprinkle the remaining flour mixture on top of the apples.
7. Bake on the middle rack of your oven for 1 hour and 15 minutes, or until golden brown on top and you see the apples bubbling. It is a good idea to put a baking sheet on the rack beneath the pie/cake while it cooks. The apples release a lot of juice. (which is part of the magic of this dessert, but it may make a mess if it comes out all over your oven)
8. Remove the pie/cake from your oven, and allow it to cool completely in the pan before you remove the outer band. Serve and enjoy!
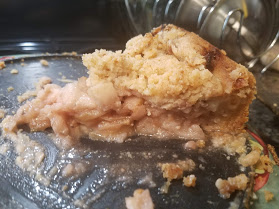 |
| This here folks is the last piece. I had to fight to get a picture. |
At first glance you may think this dessert has an identity crisis being both pie and cake. But what I have found is that this recipe takes the best parts of both cake and pie and combined them into something beautiful. Super easy prep. There is a biscuit-like dough to prepare that gets pressed in as the crust, apples with just lemon and cinnamon go on top, and then more of the same dough sprinkled on the apples. At some point in the oven the apples release their juice combining with the crust and sprinkled bits, and it becomes a magical mash-up of cake and pie. It cooks for a while, so go read a book or fold some laundry, but it is worth the wait, I assure you.

Apple Pie Cake
Ingredients:
2 Cups flour
1 cup light brown sugar, packed
2 tsp ground cinnamon
Pinch of Salt
1/2 lb (2 sticks) cold butter cut into pieces
5 lbs (about 12 medium) apples
-Granny Smith apples hold up well in this cake/pie
2 tbsp lemon juice, or the juice of one lemon
Directions
1. In a large bowl, combine flour, brown sugar, salt and 1 tsp of cinnamon. Using a pastry blender or two table knives, cut in the butter until it is incorporated in pea-size pieces. (this is just like making scones or biscuits) The mix will be dry and crumbly, but will stick together if you pinch it with your fingers.
2. Preheat oven to 350 degrees.
3. Cut apples into thin slices. *some people peel their apples here. I don't. No one in my family cares enough, and I like the peels, but do what you like* Toss apple slices with remaining cinnamon and lemon juice. (I also used a pinch of cloves, allspice and cardamom)
4. Press 2/3 of the flour mix into a 9 inch spring-form pan. You will want to press the mix to cover the bottom and work it up the sides of the pan to make a crust.
5. Pour the apples into the prepared crust. Press the apples down as much as you can into the crust. They will mound over the rim of the pan, that's ok.
6. Sprinkle the remaining flour mixture on top of the apples.
7. Bake on the middle rack of your oven for 1 hour and 15 minutes, or until golden brown on top and you see the apples bubbling. It is a good idea to put a baking sheet on the rack beneath the pie/cake while it cooks. The apples release a lot of juice. (which is part of the magic of this dessert, but it may make a mess if it comes out all over your oven)
8. Remove the pie/cake from your oven, and allow it to cool completely in the pan before you remove the outer band. Serve and enjoy!
Tuesday, October 4, 2011
Pumpkin Scones with Cranberry Butter
This scone recipe rocks and it is so nice on a cold fall morning. Enjoy!!
Cranberry Butter:
2 Tablespoons Dried Cranberries
1/2 cup boiling water
1/2 cup butter, softened
3 tablespoons confectioners' sugar
Dough:
2 1/4 cups flour
1/4 cup packed brown sugar
2 teaspoons baking powder
1 1/2 teaspoons pumpkin pie spice (or just mix your own sweet spices)
1/4 teaspoon salt
1/4 teaspoon of baking soda
1/2 cup cold butter
1 egg
1/2 cup canned (or home pureed) pumpkin
1/3 cup whole milk
Place cranberries ina small bowl; add boiling water. Let stand for five minutes, drain and chop. In a small mixing bowl beat butter until light and fluffy. Add confectioners' sugar and cranberries; mix well. Cover and refrigerate.
Preheat oven to 400 degrees. In a large bowl combine flour, sugar, baking powder, spices, salt and baking soda. Cut in butter until mixture resembles coarse crumbs. In a small bowl whisk together egg, pumpkin and milk; add to dry mixture and stir together with a fork until just combined.
Turn the dough out onto a floured surface and knead 10 times. Pat into an 8-inch circle. Cut into eight wedges. Place wedges on a greased or wax papered cookie sheet and bake for 12-15 minutes
Subscribe to:
Posts (Atom)